
17 ways to speed up Windows 10
1 . Change your power settings
Windows 10’s “Power Saver” mode will slow down your computer if you use it. To conserve energy, that approach lowers your PC’s performance. (Most desktop PCs feature a “Power saver” setting.) Your performance will immediately improve if you switch from “Power saver” to “High performance” or “Balanced.”
Start the Control Panel software, then choose Hardware and Sound > Power Options to complete the task. The two choices are usually “Balanced (recommended)” and “Power saver.” (Depending on the make and type of your vehicle, you may also see alternative plans here, some of which are branded by the maker.) Select “High performance” by clicking the downward pointing arrow next to “Show additional plans.”
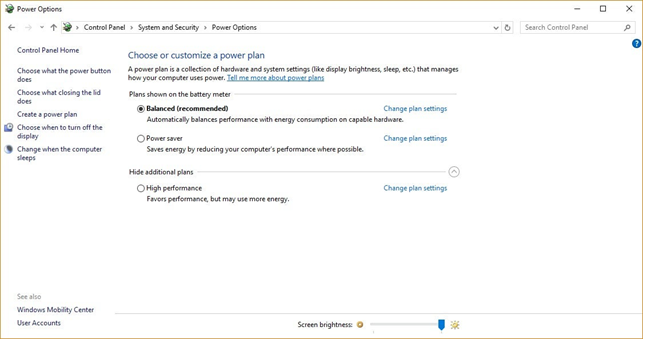
Simply select the desired setting, then close Control Panel, to modify your power setting. While “High performance” offers you the greatest oomph, it also consumes the most power; “Balanced” strikes a balance between power consumption and improved performance; and “Power saving” makes every effort to extend your battery life. There is no reason for desktop users to select “Power saver,” and even laptop users should think about selecting “Balanced” while the device is unplugged and “High performance” when it is plugged in.
2 . Disable programs that run on startup
Your Windows 10 computer may feel sluggish for several reasons, including the presence of too many background programs that you infrequently or never use. You can improve the performance of your PC by stopping them from running.
Launch the Task Manager first: To access Task Manager, press Ctrl-Shift-Esc, right-click the bottom-right corner of your screen, type “task manager” into the Windows 10 search box, and then press Enter. Click “More details” at the bottom of your screen if the Task Manager opens as a little app without any tabs.
After that, the Task Manager will show up with all of its tabs open. There are many things you can do with it, but we’re only going to concentrate on getting rid of pointless startup programs.
On the Startup tab, click. When you start Windows, a list of the applications and services that run will be visible. Each program’s name, publisher, whether it is set to run automatically at launch, and “Startup impact,” or how much it slows down Windows 10 at startup, are all listed.
Right-click a program or service and choose “Disable” to prevent it from starting at startup. The program is still possible to be used once it has been launched; this merely stops it from starting up at startup. Additionally, you can simply go back to this section of the Task Manager, right-click the application, and choose “Enable” if you later decide that you want it to run when the computer starts up.
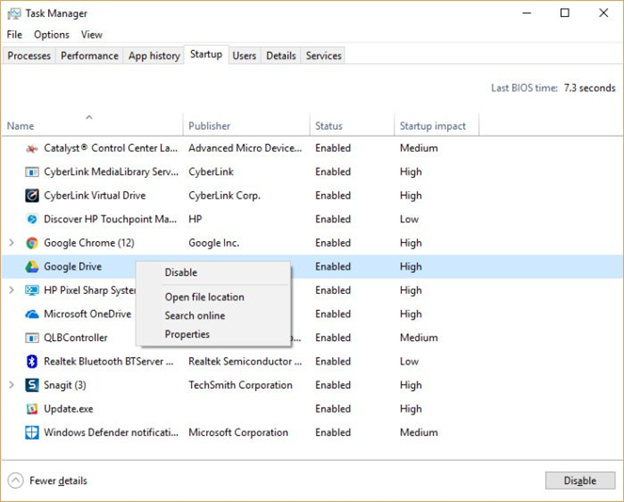
You may be familiar with many of the applications and services that start up automatically, such as OneDrive or Evernote Clipper. But many of them could be unfamiliar to you. (Raise your hand if you know what “bzbui.exe” is right away. It’s unfair to Google it first.)
You can learn more about programs you are unfamiliar with using the Task Manager. For further details about an object, such as its location on your hard drive, whether it has a digital signature, and other details like the version number, file size, and the most recent time it was edited, right-click the item and choose “Properties.”
Right-click the item and choose “Open file location” if you choose. You might learn more about the function of the software from the fact that it launches File Explorer and navigates to the folder containing the file.
Finally, and maybe most useful, you can right-click and choose “Search online.” Following that, links to websites with details about the software or service will appear in Bing.
You can look up the file name on the Should I Block It? website run by Reason Software if you’re concerned about one of the mentioned applications. You’ll usually find very solid information about the program or service.
When you restart your computer, the system will be far less concerned with useless apps now that you’ve chosen every software you want to disable upon startup.
3. Go to a Previous Restore Point
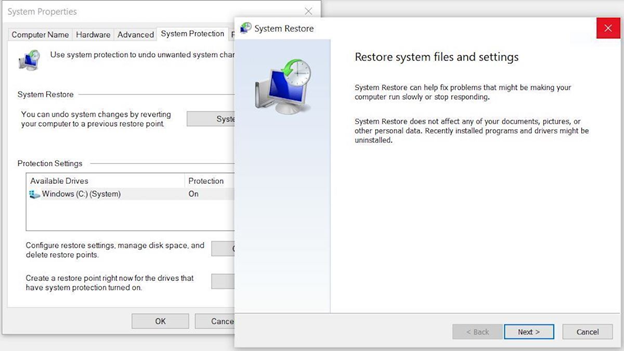
As you work with Windows 10, the operating system automatically creates restore points, which are essentially snapshots of your computer at precise times in time with all of the latest updates, drivers, and installed programs. Restore points serve as a sort of safety net, allowing you to always return your computer to a previous state in the event of an issue.
If you discover that your PC has started to slow down for no apparent reason, you may also utilize them to speed it up. Going back to an earlier restore point could speed things up again because the system will be put back in the condition it was in before the issues occurred, which could be caused by recently installed faulty drivers, software, or upgrades.
But keep in mind that you can only return your system to the condition it was in over the previous seven to ten days. (You won’t lose any files by accessing a restore point because restore points don’t affect your files.)
To go to a previous restore point:
- Save any open files and close all your programs.
- In the search box type advanced systemand then click View advanced system settings. You’ll be sent to the Advanced tab of System Properties in the Control Panel.
- Click the System Protection tab.
- In the System Restore area, click System Restore. From the screen that appears, click Next.
- You’ll see the most recent restore point. Click Next if you want to go to that restore point. To see others, click Show more restore points. Highlight the one you want to use and click Next.
- Click Finish from the screen that appears.
- Your system will restore to the restore point you chose and shut down. Restart your PC.
Note: there’s a chance System Restore isn’t turned on, meaning you won’t be able to use this tip. If that’s the case, you should turn it on to solve any future problems. To do so:
- In the search box, type creates a restore point,then click Create a restore point.
- On the System Protection tab and select Configure.
- Select Turn on system protection.Leave the other settings on the page as they are.
- Click OK. From now on your PC will automatically create restore points.
4 . Use ReadyBoost to speed up disk caching
Windows 10 frequently cache cached data on your hard drive and then retrieves it when necessary. The speed of your hard disc determines how long it takes to retrieve cached data. Use the Windows ReadyBoost function to increase cache speed if you have a conventional hard disc rather than an SSD. Since a USB flash drive is quicker than a hard drive, it instructs Windows to cache data there. Data retrieval from that quicker cache should accelerate Windows.
First, connect a USB flash drive to a USB port on your computer. The flash drive must support USB 2.0 at the very least, and USB 3 or faster is preferred. You should experience a greater speed boost the quicker your flash drive is. For best performance, find a flash drive that is at least twice the size of the RAM of your computer.
After connecting the drive, click “This PC” in File Explorer. Find the flash drive if you can. It might have a strange name, like UDISK 28X, or something even less recognizable. Click the Properties tab, then the ReadyBoost tab, after right-clicking it.
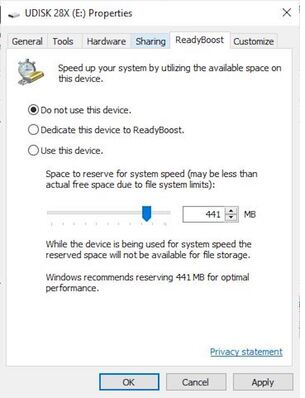
You’ll reach a screen that suggests a cache size and asks if you want to utilize the flash drive as a cache. Leave the cache size as is or change it if you like. Choose “Dedicate this device to ReadyBoost” after that. then click OK after selecting Apply.
(Note that if the notice “This device cannot be used for ReadyBoost” appears when you click the ReadyBoost tab, your flash drive doesn’t fulfill ReadyBoost’s minimum performance specifications, and you must insert a new one.)
You might notice an increase in disc activity when ReadyBoost begins to load the cache with files while you use your computer. Depending on how frequently you use your computer, it can take a few days for your cache to fill up and provide the most possible performance boost. Try a flash disc with additional capacity if you don’t see a performance improvement.
Reminder: If you have an SSD, ReadyBoost won’t give you any more speed, and it can even degrade performance. Thus, avoid using this on a system that has an SSD.
5 . Shut off Windows tips and tricks
Windows 10 monitors your activity while you use the computer and provides suggestions for things you might like to do with the operating system. In my experience, this “advice” is hardly ever helpful. The privacy issues of Windows continually nearly looking over my shoulder bother me as well.
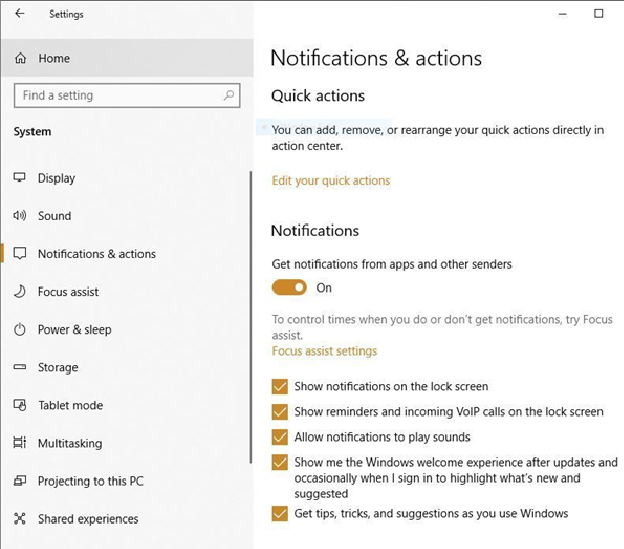
Windows monitoring your activity and providing suggestions might potentially slow down your computer’s performance. Therefore, instruct Windows to cease offering you recommendations if you wish to speed up the process. To do this, open the Settings icon from the Start menu, click Settings, and then pick System > Notifications & actions. Uncheck the box next to “Get tips, ideas, and suggestions as you use Windows” in the Notifications section by scrolling down.
That’ll do the trick.
6 . Stop OneDrive from syncing
Windows 10 includes Microsoft’s cloud-based OneDrive file storage, which keeps files updated and synced across all of your PCs. If your PC or its hard drive fails, you may still access all of your files thanks to this practical backup solution.
It accomplishes this by continuously syncing files between your computer and cloud storage, which can slow down your computer. Stopping synchronization is one approach to making your PC faster because of this. However, you should first determine whether it is slowing down your PC before permanently turning it off.
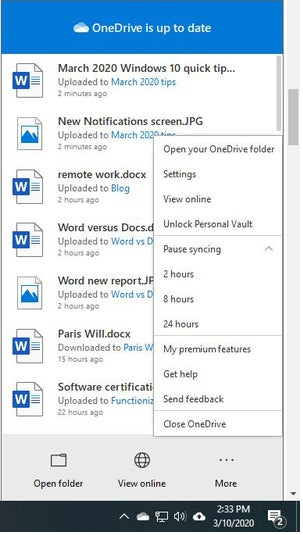
Click the More button at the bottom of the screen after right-clicking the OneDrive icon (which resembles a cloud) in the notification area on the right side of the taskbar. Depending on how long you want it to be halted, choose 2 hours, 8 hours, or 24 hours from the popup box that displays when you click “Pause syncing.” Check to see whether there is a perceptible speed boost during that time.
If this is the case and you decide that you do want to disable syncing, right-click the OneDrive icon and choose Settings > Account from the popup menu. On the screen that displays, click “Unlink account” after clicking “Unlink this PC.” When you do that, you can still save your files to your OneDrive local drive, but cloud syncing won’t happen.
You can try troubleshooting OneDrive issues if you discover that OneDrive slows down your PC but still want to continue using it. Visit Microsoft’s “Fix OneDrive sync difficulties” website to learn how to accomplish that.
7 . Use OneDrive Files On-Demand
Because doing so would violate OneDrive’s goal of ensuring that you always have the most recent files on whichever device you use, some users might not want to stop OneDrive from syncing. Additionally, it would prevent you from using OneDrive as a secure method of file backup.
However, there is a way to have the best of both worlds: limit your syncing to the bare minimum and only use it as needed. While improving performance, you’ll still benefit from OneDrive’s greatest features.
You use Windows’ OneDrive Files on-Demand capability to accomplish this. With it, you can decide which files to keep on your PC while still having access to all of your other OneDrive files online. One of those online files is opened directly from the cloud when you want to use it. You should see the improved performance since fewer files are being synced on your PC.
Select Settings from the context menu that appears when you right-click the OneDrive icon in the Taskbar and then click the Settings tab in the dialogue box that follows. Files On-Demand has a checkbox next to it. Select Open Folder by clicking the OneDrive symbol right now.
A File Explorer window displays OneDrive. To remove files from your computer and just keep them in the cloud, right-click the folder and choose “Free up space.” The files in that folder will no longer be stored on your computer but will remain in OneDrive’s cloud storage.
Right-click the folder and choose “Always Keep on this Device” for each folder whose files you want to keep on your PC. Any folder’s parameters can be changed at any moment by right-clicking it and selecting your desired action.

Go back to the OneDrive settings dialogue box and uncheck the box next to Files On-Demand if you decide to change your mind and prefer to have all of your files locally stored and synced via OneDrive.
Keep in mind that OneDrive Files On-Demand is only compatible with Windows 1709 and later.
8 . Turn off search indexing
Windows 10 indexes your hard drive in the background, theoretically enabling faster PC searches than it would otherwise. However, slower PCs that employ indexing may see a performance drop; however, by disabling indexing, you can increase their speed. Turning off indexing can increase speed even if you have an SSD disc since indexing constantly writes to the disc, which over time can make SSDs less responsive.
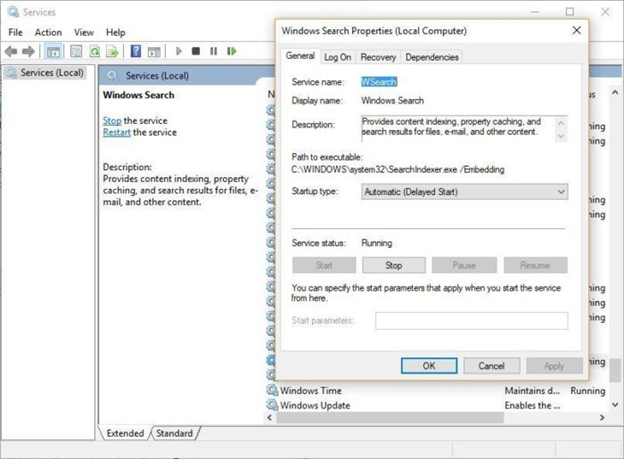
You must entirely turn off the index in Windows 10 to reap its full benefits. Type services to do that. Enter MSC into the Windows 10 search box. An app called Services emerges. Scroll down to Windows Search or the Indexing Service in the list of services. Click Stop on the screen that displays when you double-click it. Then restart your computer. You might not even notice that your searches are a little bit slower. However, your overall performance ought to improve.
You have the option to disable indexing exclusively for files in specific places. To achieve this, enter “index” in the Windows 10 search box and select the result labeled “Indexing Options.” The Control Panel’s Indexing Options page appears. You’ll see a list of places that are being indexed when you click the Modify button, including Microsoft Outlook, your files, and others. Any place will no longer be indexed if the box next to it is unchecked.
9 . Clean out your hard disk
Your PC may be running slowly if your hard drive is clogged with unnecessary stuff. You might move faster after cleaning it. Storage Sense, a surprisingly handy built-in utility in Windows 10, is available for this purpose. Move the toggle from Off to On at the top of the screen by going to Settings > System > Storage. When you enable this, Windows continuously scans your computer for outdated garbage files that you don’t need and removes them, including temporary files, Downloads folder items that haven’t been modified in a month, and old Recycle Bin files.
You can alter Storage Sense’s functionality and use it to clear up even more space than it would ordinarily. Click “Configure Storage Sense or run it now” underneath Storage Sense. You can modify the frequency with which Storage Sense deletes files from the screen that shows (every day, every week, every month, or when your storage space gets low).
Additionally, you may specify how long to wait before automatically deleting items from the Recycle Bin and how long to wait before deleting files from your Download folder using Storage Sense. Additionally, if a file isn’t opened for a predetermined period, Storage Sense can shift it from your PC to Microsoft’s OneDrive cloud storage (every day, or every 14 days, 30 days, or 60 days).
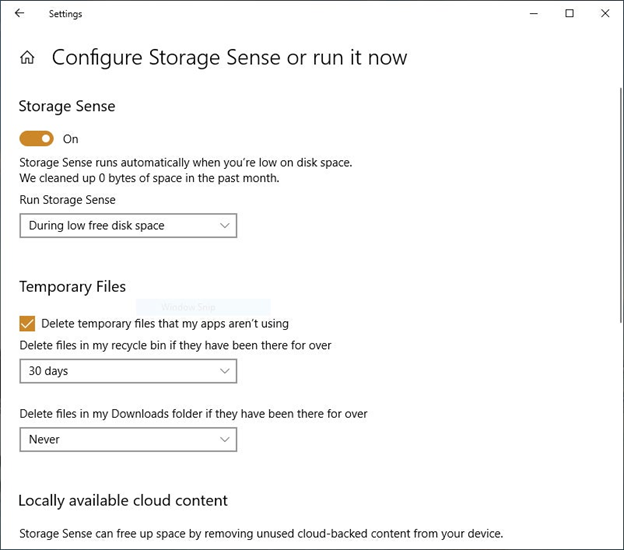
Older versions of Windows that might be taking up space can also be deleted. Check the box next to “Delete prior Windows versions” at the bottom of the screen. After 10 days have passed since the installation of an upgrade, Storage Sense will then erase older versions of Windows. You should be aware that if you do this, Windows will no longer allow you to go back to an earlier version.
10 . Clean out your Registry
The Registry monitors and manages almost every aspect of how Windows behaves and functions internally. That contains details about where your programs are kept, which DLLs they use and share, which programs should open particular file kinds, and pretty much anything else.
However, the Registry is a rather unkempt object. For instance, the Registry isn’t always cleared out when you uninstall a software, leaving behind its settings. Because of this, it may gradually fill up with a wide variety of outdated settings. System slowdowns may result from this.
Never, ever attempt to clean any of this out on your own. It’s not feasible. A Registry Cleaner is necessary for this. There are several options, both free and paid. But since the Auslogics Registry Cleaner, which is available for free, does a good job, there’s no need to buy one entirely.
[ Further reading: 8 steps to install Windows 10 patches like a pro ]
You should back up your Registry before using Auslogics or any other Registry Cleaner so you can recover it if something goes wrong. (Auslogics Registry Cleaner also takes care of this for you, but it doesn’t hurt to maintain a backup.) Enter Regedit. ext into the search box to perform your Registry backup. Thus, the Registry editor is launched. Select Export from the File menu to start. Make sure to select the “All” option in the Export range area at the bottom of the screen from the resulting screen. Next, select a file location and name, and then click Save. Open the Registry Editor, choose Import from the File menu, then open the file you saved to restore the Registry.
Now download Auslogics Registry Cleaner, set it up, and launch it. You can choose the categories of Registry issues you want to fix on the screen’s left, such as File Associations, Internet, or Fonts. Usually, I pick them all.

Next, instruct it to check the Registry for issues. To do that, click “Scan Now” and then choose Scan from the drop-down selection that displays. This enables you to first review the Registry issues it discovers. Instead, selecting “Scan and Repair” canses the fixes to be applied without your approval.
Now it checks your Registry for problems and displays the results to you. It rates the faults in order of severity to make it easier for you to choose which to correct. When you’ve made your choice, click Repair and make sure “Back Up Changes” is selected so you can quickly restore the Registry if something goes wrong.